Chances are you've wondered how exactly you are supposed to do more damage and may have even asked in a class discord how to do this. More than likely the answer has been either "get gud" or "just practice and you'll learn." This post will go over a more methodical list of ways that you can make a difference in your DPS. There will be a post on how-to-tank better and maybe a how-to-heal better (I don't main a healer) in the future. The points made in this post will apply to tanks and healers when DPS'ing but there are specific considerations for the other two roles that will be neglected here. Some of the posts will involve stuff that helps with legacy gear. Those parts are somewhat irrelevant for new patch 86 gear but the fundamentals still apply. There's a LOT of stuff here that goes well beyond simply enchanting your gear. Chances are you'll find something you can use unless you're already BiS and pro.
If you need a TL;DR, read the section titles. There's a lot here but it's all useful so give it a read when you get a chance.
Note
There's a lot of stuff to fill in so it'll be expanded on over a few days. But it's still useful while only partially complete so it's being published a bit early.
I. Learning Your Class
This is somewhat generic but pretty important. The specific sections will go into a lot more detail. You need to learn how to use your class effectively in several different ways. Some of these bits are fixed "tunings" that you set outside of combat. Some of the bits are stuff you have to actively do while in combat.
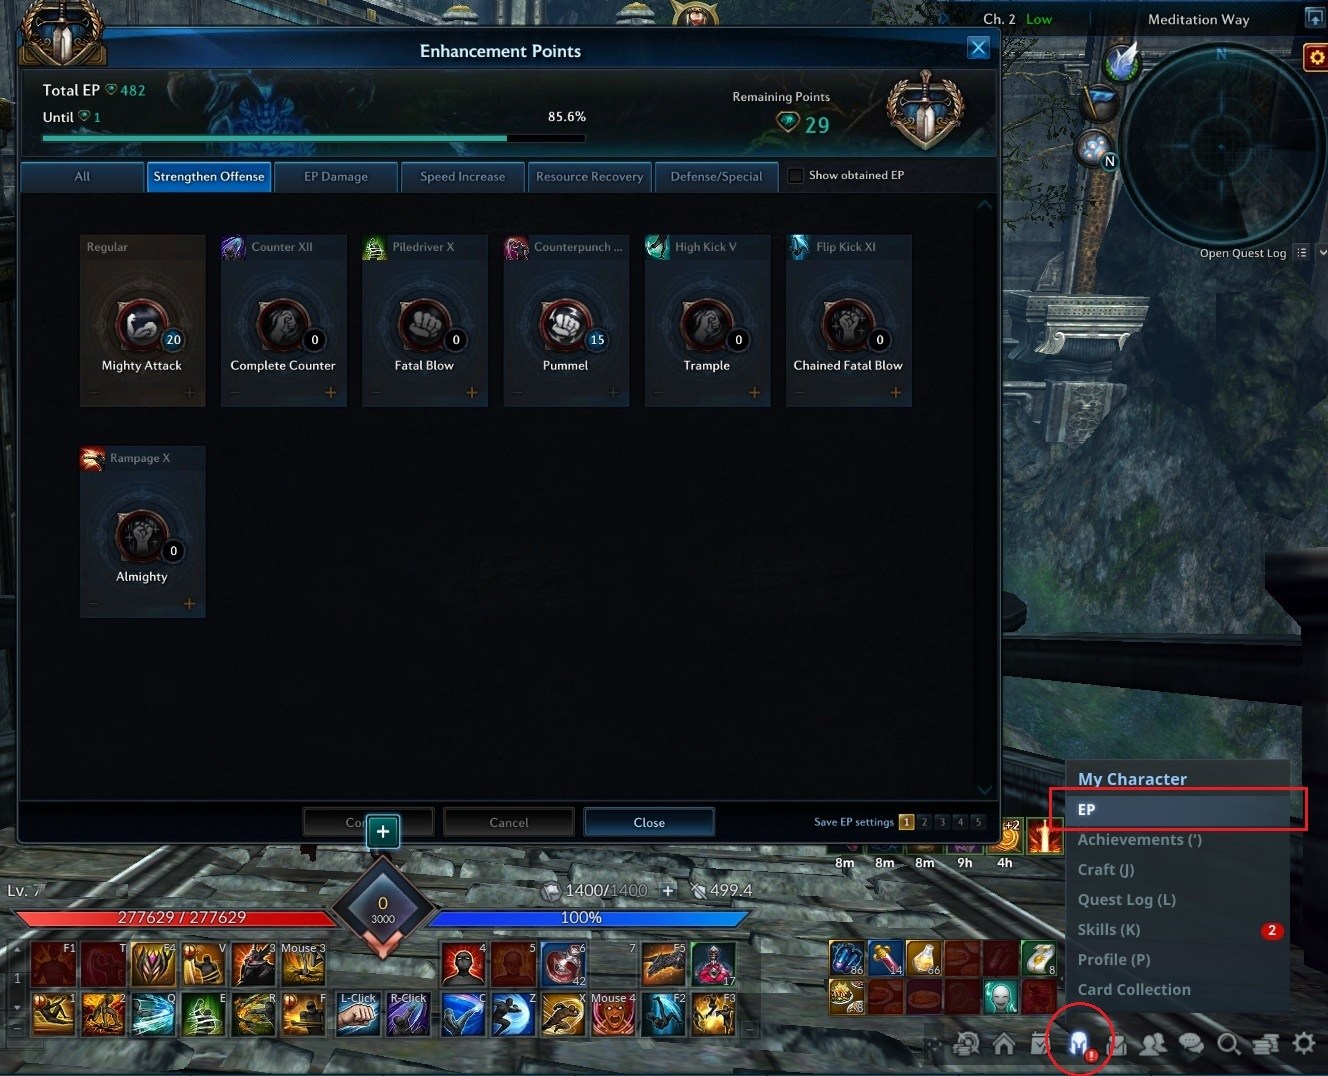
A. Getting you EP talents right

Now that everyone gets 300 EP points automatically, you can immediately take at least the base EP talents for your class. Generally speaking, you'll take the following with your points at first.
- You'll max out power increase (Mighty Attack) for a flat damage increase percentage. If you were actually starting from 0 points, you'd want to prioritize talents that change the way your class plays first. But since you get 300 points, you can knock this one out first and still have points left over for the other high priority talents.
- If you have a self buff, you should have two talents that apply. One will likely extend the duration of your buff, and the other will increase the effect, and is limited by the first part.
- The remaining points will be spent on moves that change your cooldowns or otherwise impact your gameplay in a fundamental way.
- Generally speaking, NEVER use points on EP Attack. It scales poorly and you shouldn't bother with points on these unless you have nothing else to spend them on.
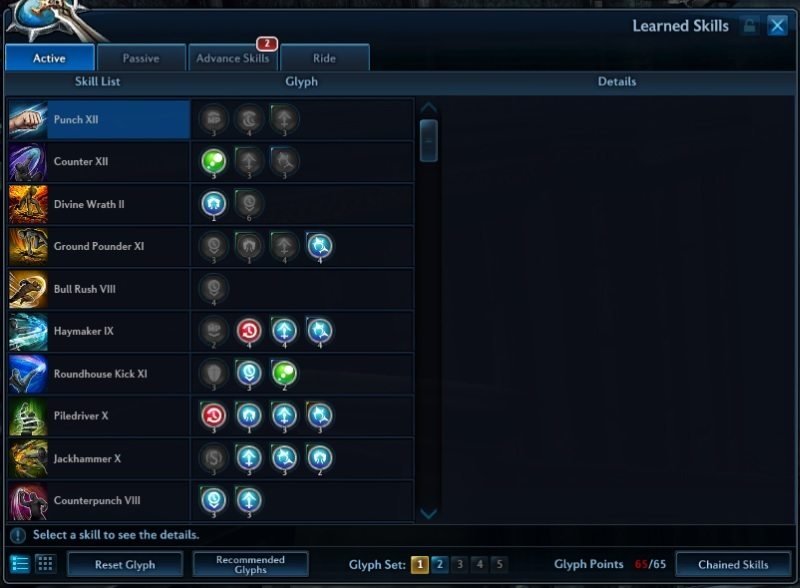
B. Getting your glyphs right

Using the right glyphs mean key skill will do more damage and buffs will last longer and / or synchronize more easily with the rest of your party. If you had to recreate your glyphs from scratch, prioritize skill damage, buff cooldowns, buff uptimes, skill synergies, and quality of life glyphs. Then you'd run some content, check your damage breakdowns, and then adjust your skill glyphs if you spent points on a low damage contribution skill. Keep in mind that you'll have 55 skill points at level 65, you'll get +5 from completing apex, and +1 for each level from 66 to 70. You also need to unlock some of your important glyphs and get more optimized version in order to achieve the glyph pages you see in the guides. Check out the article on how to get all your skill glyphs for more guidance on how to farm glyphs.
- Make sure your glyphs are correct. Prioritize DPS, buff, and cooldown glyphs.
- Don't waste points on low damage skills.
- Unlock your rare glyphs.
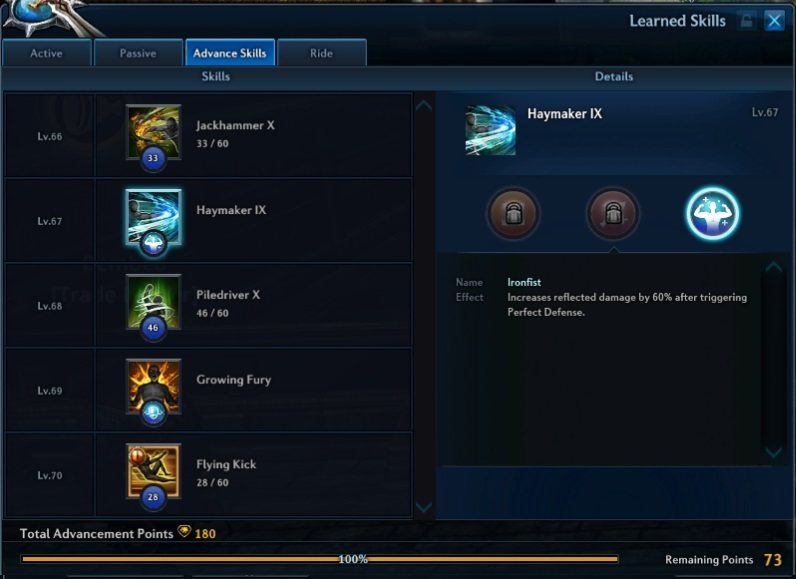
C. Getting you talyphs right

The tal's at level 66, 68, and 70 are the kind of thing you gradually build up as you accumulate skill points to use. The 67 and 69 'yphs are unlocks and you should take care of them as soon as you level and have the optimization scrolls needed. Check your guides to figure out which 'yph to turn on and when. Sometimes you get a solo-content optimized one and a dungeon one and you'll need to remember to swap it back when needed. For the tal's, there will be a priority between the three skills you can buff and you should advance them appropriately. Check out the article on advanced skills and talyphs for more guidance on farming your advanced skills.
- Unlock your 'yphs at level 67 and 69
- If you are swapping between 'yph settings for different content, remember to change them when your context changes.
- Prioritize which skills you advance appropriately.
D. Getting good Hits Per Minute (HPMs)
Getting more hits per minute of your high damage skills will directly translate into higher damage. This is also a relatively stable comparison point between different types of gear because the only major differences between a best in slot player and a newer player is a few percent of cooldown reduction. There's a lot of stuff that can impact your HPMs so the factors are broken down in the following sections.
1. Chaining skills
First video - Lancer's Spring Attack skill being casted with no pre chained skill. Second video - Spring Attack being casted after Shield Barrage (which is a chain skill for Spring Attack). During the same amount of time we managed to perform 3 attacks with skill chaining.
Casting a skill unchained is called hard-casting. A hard cast is always slower than a chained cast, if a chained cast is possible. There are cases where you have to hardcast a skill, like at the start of a chain. But when possible, you want to be casting skills chained. Most skill chains are documented in the skill tooltip but some are hidden and you'll have to consult your class guide to discover these.
- Cast your skills as chained casts when possible to improve your HPMs.
2. Using animation cancels effectively
In the video above we can see a simple example of animation cancel. Brawler's combo Tornado (LMB>LMB>LMB>RMB) is performed in casual form (1st video - hitting all 4 buttons in sequence) and with cancel animation form (2nd video - canceling 3rd LMB with early RMB). The second method is obviously quicker.
Skills consist of a series of windows of time that dictate the animation and when the skill hits or "ticks" will register. This is broken down in detail in Nep's Brawler guide. All (as far as the author knows) classes have at least one skill that will cancel out other skill animations as long as they are not in their animation lock time window. The difference between not cancelling whenever possible and cancelling whenever possible might only be a few percent, but it adds up. Note that in some cases, you are able to cancel a skill BEFORE the ticks will register, cutting off your damage potential. This is notable with Lancer <Spring Attack> and Warrior <Blade Draw> and should be carefully avoided.
- Cancel your animations when possible, after all damage ticks have registered, to increase your HPMs.
3. Reacting to cooldown resets

Some classes will have random skill resets. Say hypothetically a given skill will reset 50% of the time. If you ignore it and use a fixed rotation and get 12 HPM over the course of a several minute fight, then you missed out on potentially up to 18 HPM. Imagine if this skill contributes to a quart of your DPS. See the potential DPS loss? If your class is subject to cooldown resets as a normal part of playing, then you MUST learn to catch these resets and use the opportunity it presents. Note that some EP talents will give you a chance to "add" a reset chance to some skills. In most cases, this is a useless talent because the odds are either minuscule, or the skill they effect is not important for your DPS.
- Don't use a static or fixed rotation if your class has cooldown resets on a key skill. In general don't use a static rotation but this is more important with resets.
4. Recovering from breaking rotation for mechanics
If the boss never moves or requires you to do anything, then you could theoretically use a fixed, predetermined skill rotation for the duration of the fight. But most bosses will move, push you, or otherwise break your rotation and you'll have to recover from the interruption. Being able to do a mechanic or avoid an attack that you should avoid, and then minimize your downtime will improve your DPS. You have to know your class well enough to be able to recover from an interruption at almost any point in your rotation, and pick back up with just a second or two or downtime.
- Minimize the downtime that results from doing a boss mechanic or otherwise repositioning. Know your class well enough to get right back into your rotation without negative side-effects.
5. Using cooldown reduction synergy between skills
This is similar to resets in that you'll get more HPMs on your key skills because they will come off cooldown more frequently. The difference is in how the skill comes off cooldown. Examples of this include the propulsion passive for Slayer where crits / hits of some skills will reduce the cooldown of other skills. On Brawler, with the Haymaker talent maxed, crits will result in lower cooldown (plus the simultaneous reset chance). You'll have to check your class guides to see what kind of cooldown reductions you have. In most cases, you'll maximize the reductions by simply following the skill priority guidance.
- Use cooldown reduction from your skills to get key skills off cooldown sooner so you can get a higher HPM
E. Prioritizing skills correctly

Brawler example. The best skill to use right now - Haymaker
When presented with multiple skills off cooldown, you need to pick the right skill to use next. Which skill you pick is initially determined by your class skill priority list, but later it'll be instinctive based on repetition from making the same choices over and over again. The next step is start planning ahead based on the skills about to come off cooldown. Similar to planning based on what cooldowns remain, you should have some "feeling" for what is off cooldown or what is going to come off cooldown. It's not really a feeling so much as you get used to using certain skills at certain points in your rotation and can anticipate the timings as long as you aren't interrupted.
- Internalize your class skill priorities through repetition
- Be able to plan your moves a few steps ahead with a glance at your cooldowns and the boss cues
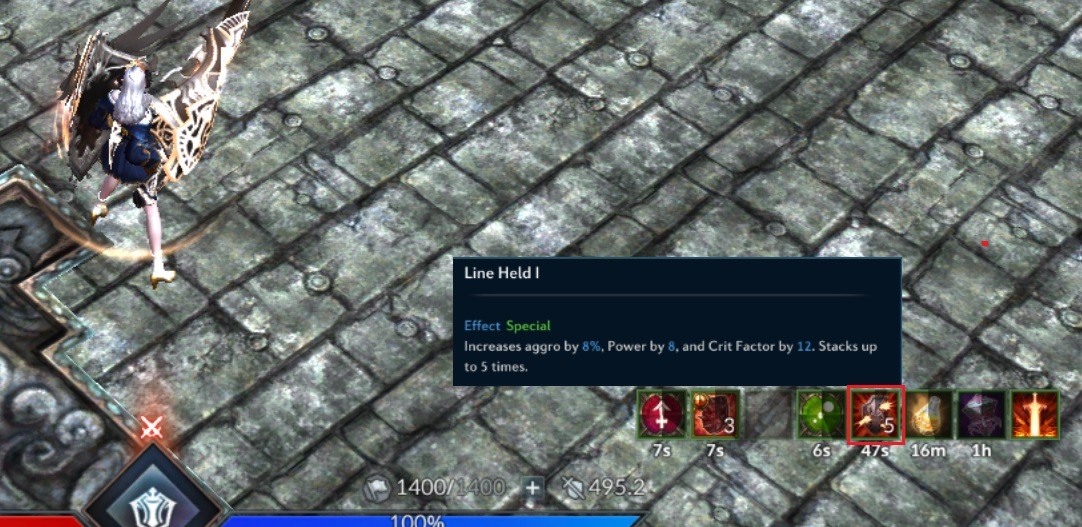
F. Getting good self-buff and skill synergy buff uptimes

Most (every?) class has some kind of self buff move. When you first start playing, you might be neglecting this buff entirely. The first step is to start using it in the first place! Buff modes generally reduce cooldowns, increase attack speeds, and increase the damage of certain skills. The second step is to getting used to catching when your self buff comes off cooldown and either using it as soon as possible or delaying for a short period of time to sync with your party.
Self buff modes are more pronounced when they are up. Skill synergy buffs are more subtle but also important. These usually take one of two forms. 1) doing skill A will increase the base damage of skill B. 2) doing skill A will increase all skill damage by some percent for some period of time. If you are following the skill priorities in your class guide then you will likely get good skill synergy buff uptimes. Sometimes knowing that this is a side-effect will help motivate following the priority. If you are using Shinra meter, you can check your buff uptimes graphically in the excel document that can optionally be generated with each fight. It won't show up in the moongourd uploads or in the regular Shinra UI.
- Use your self buff moves.
- Use your self buff moves often and with minimal downtime.
- Sync with your party and the boss for greater effect.
G. Using your skills for movement and positioning efficiently
Apart from i-frame, different skills can be used to move around a battlefield avoiding attacks or to quickly position yourself.
When you start out playing and you need to move someplace quickly, you'll probably use your evasive roll or i-frame move and your dash-type move as your default. Later on if you continue to do this, you'll handicap yourself from using your i-frame when you actually need it. So how should you actually move? Use your other skills! Most skills have some built in forward movement as long as you aren't blocked by the boss or another player. When would you actually need to use a skill to move? Imagine you have mechanics that you *must* I-frame, but it hasn't happened in a while. An AoE attack comes up and you are a few meters away from the edge of the AoE. You can't make it with regular walking while in combat but you also don't want to use up a long distance movement skill or an i-frame. So you use a regular skill with enough movement instead and then you can get back into position with all your core options still available if you need them.
- Don't rely on your i-frames to move around the field, learn to use your other skills as movement.
II. Setting Up Your Gear Correctly
In some ways, the patch 86 gear took out some of the decision making when it comes to gear. Rolls and crystals are "baked in" for your main four pieces but still relevant for your accessories in old and new gear.
A. Using the right Rolls when applicable
If you are using new gear then your main four pieces (weapon, armor, hand and footwear) will have fixed rolls. Otherwise you should be picking yellow lines in most cases.
Weapon
With legacy gear, you get to pick a "top line" that is a duplicate of one of your other lines, and then the remaining lines of enchantments. The topline is what made a class "double cooldown" or "double enrage" because you would have two instances of those lines on your weapon. None of the other top line options were viable. For the remaining lines, you usually pick yellow enchants and skip flat 6% damage if you are starting out at Twistshard, since it is missing a fourth bottom line. In some classes, the 0.3 Crit Power was a viable alternative to flat damage. If you are leveling pre 65, you can still "optimize" your rolls when possible by choosing similar rolls to end game gear.
Armor
With legacy gear on the chest armor, you also get a top line, but the uniqueness came from it enhancing one of your skills. This is generally fixed to one skill or a choice between two skills depending on the conditions. Check your class guide for more info. The remaining lines are the same on all DPS, pick yellows, and skip the HP line if you are in Twistshard since you are missing a line option.
Boots
Boots are simple, yellow lines, but you might pick the slowing effect decrease in place of the MP replenishment in some cases.
Gloves
You only get to pick yellow lines on gloves so there's not really a choice here anymore.
Accessories
The accessory options still give you a chance to screw up your rolls since there are no yellow lines. You have to know the right choices. While you can look them up in general, the method for selecting is based on the following:
- Health % and endurance points are equal. If one is less than the other, then pick the greater.
- Crit factor and power are weighted 2 to 1. If you have a choice between 8 crit factor and 4 power, the choice is equal. If you have 6 crit factor and 4 power, choose the power.
With those guidelines, you can pick all your lines with the only choice being in your circlet. You can get either 8 crit factor or 4 power, and only one line, so it's an equal trade and you can take either one depending on your crit cap needs.
B. Using the right Crystals, when applicable
While new gear has weapon and armor crystals baked in, you'll still need them in legacy gear. And everyone needs them on earrings and rings. DPS weapon crystals are the same with the only difference being for ranged classes vs melee. The crystals will give you more damage to enraged monsters, when attacking from the back, and flat damage. Armor crystals are just flat defense because it generally scales better than doing HP.
- Pounding - Flat damage increase from any direction
- Bitter / Spiteful - Crit Power increase, either from behind (melee, bitter) or from behind and sides (ranged, spiteful).
- Savage - Critical attack damage (crit power, but not worded as such) from back attacks
- Focused - Crit Power increase when the target is enraged, from any side.
- Hardy - Flat damage reduction
Accessory crystals will either be for more crit factor, more power, or attack speed in some cases. Remember they can break on death if you aren't using a crystalbind.
- Swift Vyrsks - attack speed
- Keen Vyrsks - crit factor crystals
- Powerful Vyrsks - power crystals
C. Choosing the right amplification type

With the new gear, you get to "choose" whether you are amplifying physical or magical damage. The developers and or designers probably thought this was a choice and might add some customization to the game but really you are fixed into either physical or magical depending on your class. Check your guides and try not to grab the wrong set or else you'll have to start over with enchants if you enchanted the wrong ones.
D. Having the right etchings
Check your class guide to see what is suggested. In general, the weapon and gloves will be used for either energetics or extra power/crit factor, and the armor and footwear will be extra endurance. All accessories will be crit factor or power as needed. Read more in the etchings article.
E. Using Accessory Amplifiers
Similar to etchings, you can add amplifier stats to your accessories. There's a base increase in your accessory power stat as well as a set bonus when you have multiple items that have been amplified.
III. Using Consumables Optimally
A. Bravery or Canephora

Consumable self-buff that lasts 30 minutes. Bravery will give you attack speed, damage reduction, and skill damage while Canephora will only give you skill damage but more than Bravery. Canephora also has an odd restriction, it "does not stack with effects received via Instance Matching." Bravery and Canephora are also mutually exclusive - you can't have both on at the same time.
You get Bravery potions at random from events and quests and from several token shops. List soon (tm). You can also buy them from merchants for a LOT of gold (relatively speaking) and you get them as part of the loot table for all the locked strong boxes. Canephora is a bit harder to get a hold of. With the Calendar turned off on NA-PC, I don't know how I get it at all now.
B. Noctenium

Noctenium comes in multiple forms but essentially breaks down into 2 types. Per-skill consumable item and time duration elixir form.
Per skill comes in a few different names but they are all have the same effect. Most of them are bankable and only the generic format is tradable. You can get more off the broker if you aren't getting them fast enough through regular vanguards rewards. The specific impact of noctenium depends on the skill being used but it's generally a skill damage increase. You turn on noctenium like a skill then one is used for each skills used that can benefit from noctenium.
Time duration noctenium comes in three forms. Each one lasts a different duration. 15 minutes, 20 minutes,and 30 minutes. They all increase your skill damage by the same amount. They also increase more than per-skill noctenium. You can get time duration from events and also by using noctenium refiners. They are consumable items that use 500 per-skill noctenium at a time to create one time-duration elixir.
If you want a flat damage increase, use noctenium. Elixirs will buff you more than per-skill noctenium. Double check if your prior elixir is still active or if you still have per-skill noctenium leftover before a fight starts.
C. Combat foods
There are a lot of combat food options but the main classic ones (pre patch-86) are Feasts and Lamb Bulgogi. Food buffs will usually last 15 minutes and are mutually exclusive. If you pop one and you already had the effects of one active, the new one will replace it. Feasts give you a lot of different buffs (lore-wise, it's several different combat foods combined) while Lamb Gulgogi will give you a not of HP, some attack speed, but primarily it's used for Crit Factor.
The other combat foods will give you smaller buffs like some increased max HP, MP, a bit of attack speed, power, crit resist, etc. For the most part they aren't used although Half-Moon Croquettes can be a nice if you just need a bit more attack speed but don't need the crit bonus from Lamb.
To get combat foods, you can use the broker, open locked strongboxes, use event tokens, or craft them. Fish Steak is the cooking crafting equivalent of Lamb, minus the HP buff. The foods that are missing from regular crafting can be made during the rootstock event.
D. Combat "drinks"
Combat drinks will give you a 10 second buff with a 1 minute cooldown. Yeah, 10 seconds. The usage is usually to buff you for a coordinated party burn or during your own burn while you have a buff mode activated and the boss is enraged. Combat drinks do not cancel out combat foods so you can have a food on and pop a drink without losing your food. The most common drink used is Lein's Dark Root Beer. It increases your attack speed and also makes the screen go "drunk". The other combat drink that might come in handy is Digory's Honey Moongourd Drink to facetank a mechanic and Sky Lotus Drink to skip a knockdown or stagger mechanic.
All of the combat drinks can be bought through the broker. You can also craft Lein's Dark Root Beer through regular cooking/crafting. The other wya to get Dark Root Beer is to buy Bamarama Boxes from the rootstock arena and spend some time (or use a macro) to open boxes. The drop rate is around 18% of box opens for a Lein's Dark Root Beer. You can also get Digory's drink from the bamarama boxes.
E. "Brooch" usage

At level 65, your brooch has a secondary, "skill" like effect. You can use by adding your brooch to your skill bar and casting it. In the past, the starting level 65 brooch did not have the effect right away and required an upgrade before the effect was possible. Now you start with an upgraded brooch. Remember to re-add it to your skill bar after upgrading each time.
There's two different types of brooches initially and you start with a power brooch. The power brooch will raise your power for the duration of the buff, and the crit brooch will raise your crit factor and your attack speed. Both brooch types will come back to the same type when upgraded and you'll get both buff sets: power, crit factor, and attack speed.
Use your brooch as part of your burn, usually the opening burn and your third burn if the fight lasts long enough. It's identifiable by the cool looking wings that pop out of your character (or other people's when they use their brooch).
IV. Learning the Mechanics
A. Being able to read the boss animations and anticipate mechanics
Eventually, you'll be able to see a few frames of the boss and tell what will happen in the next few seconds. Based on that you'll be able to plan what skills you'll use and whether or not you need to move for a mechanic. On a wider timeframe, you'll be able to anticipate when periodic mechanic will come up and you'll know whether or not it's a good idea to pop your self buff now or wait.
The anticipation and accurate prediction will be especially important for tanking in order to line up perfect blocks while not spending too much time waiting, but that will be covered in more detail in the eventual "tank better" article.
B. Knowing when you can facetank and when you need to react
After you can anticipate what the boss is going to do, you'll start adding in the decision of "can I take this damage intentionally or should I move?" decision. The benefit of facetanking intentionally is you won't be killed by accumulated damage or a one-shot mechanic and you can maintain steady DPS. Can't DPS if you're dead and can't dps if you are moving around and unable to attack.
Deciding whether or not you can facetank something can be a bit involved, depending on the situation. Is the boss enraged? Are you buffed or debuffed? Do you have any damage mitigation available if you need it? Is the boss actually going to hit you or are you safe? Are there any other mechanics that are likely going to happen next that you should take into account? Is the healer available to top you off on HP before the next mechanic, if you facetank this one? Eventually the important parts of this decision making can be almost instantaneous. But when you're starting out, it'll take practice.
C. Knowing what your party is most likely going to do.
If the boss is about to move based on who has secondary aggro, do you know where that person will try to place the boss? Will they make an effort to position intentionally or react in the least-effort way possible?
If a debuff mechanic based on range is about to happen, is your party going to happen and you can't take it this round, is it safe to assume someone else is going to move in to take it for you? Or should you stop DPS'ing and move?
If the boss is still 10% of health away from enraging and your self-buff is off cooldown, is your party going to coordinate on the enrage burn or are they being goof-troops and you should just go for it now while there's no mechanics coming up?
Knowing what your party is going to do will impact your planning for what to do over the next few seconds. If you're in a static party or premade, you might be able to make a lot of assumptions about their most-likely-course-of-actions. But if it's IMS, you need to pay a bit of attention to your party members, determine if they know what they are doing and acting like it, and then decide what to assume vs what to play it safe on. This decision may be based on:
- Does the tank enrage and buff the party at the start?
- Does the healer debuff and buff consistantly?
- Does the rest of the party do the mechanics or ignore them with negative results?
- Does the party say *anything* at all in party chat, like simply responding to a ready-check at the start?
Being comfortable making this determination will come with time and takes intentional practice.
D. Taking Advantage of Enrage

This is more of a "general" mechanic than a specific one for any given boss. Knowing how enrage works and planning around it will generally result in more damage. This is because there is an enraged monster damage buff "baked-in" to new gear and present in old gear when the correct crystals are used. Enrage will happen naturally when the boss loses 10% of it's health or when infuriated by a tank. It will last 36 seconds and when it stops, that will set the next 10% HP marker. If you keep track of this or use something like Shinra Meter to mark the enrage point, you will know if you should hold off on using your self-buffs and doing your big damage skills now, or wait a few seconds.
V. Reacting To Your Party
A. Adjusting your play based on the tank and healer
Section IV-C mentioned the tank and healer play but this is specifically about how different tanks and healer classes change your playstyle in general.
Tank Differences
There's four possible tanks that you can run into in a party. Their buffs differ and will result in a slightly different playstyle if they are using their buffs.
Lancers
Lancers are the most buff heavy tank you can run into. They trade their own DPS for more party benefits. Buff-wise, you'll get Adreneline rush and Guardian shout during the fight. This will give you increased power, attack speed, endurnace, and skill damage for almost a minute. You may get this buff every 2 minutes or so and if the Lancer is attentive, it will line up with enrages. Lancers also allow the party to skip up to 2 mechanics every 6 minutes using Guardian Barrier and Divine Protection. Lancers are also able to enrage the boss and can do this every 3 minutes. This allows an opening enrage as well as an extended enrage (boss is already enraged and about to end) or forced enrage (boss was not enraged to begin with) when the boss is almost dead. Lancers are also able to debuff the bosses endurance throughout the fight with a normal skill. Also remember that Guardian Barrier only protects you if you are behind the Lancer and Divine Protection has a range limit when it's cast.
Brawlers
Brawlers are able to do DPS-like damage "out of the box" but sacrifice party buffs in exchange. There's a talyph to increased nearby party member damage but it's relatively minor and otherwise negligible. The lack of buffs and inability to "skip" mechanics can make Lancers more desirable in picky parties but for normal play, it's pretty normal to see both. Brawlers are able to enrage the boss just like lancers, with a similar cooldown. Brawlers can also debuff the boss endurnace for the same amount as Lancers.
The lack of attack speed with Brawlers may motivate the use of attack speed glyphs in some classes to compensate for the change in how the gameplay feels. Alternately, Lein's Dark Root Beer use becomes more important to compensate, although it only gives you 1/4th of the buff time that an adrenaline rush buff window would give.
Warriors
Warriors can take on a defensive stance around level 50 and by level 65 they have a full set of tanking skills. At high levels with the benefit of talyphs, they are able to be tankier with more skills having frontal blocks. The learning curve for a warrior tank can be somewhat steep if not starting with a background using a Lancer though so you may not run into many warrior tanks. Warrior tanks are similar to Brawlers in that they have reduced party buffs but still deal a lot of damage. The main difference is Warriors are able to increase party attack speed with one of their buffs. The attack speed buff will last the entire fight but it's not as much as Adrenaline rush. Warriors can also infuriate bosses but they have no mechanic skip skills.
With the attack speed buff, you won't feel compelled to use swift vyrsks to compesante for the playstyle difference like you would with a Brawler. Also remember there's no adrenaline rush and guardian shout, and no mechanic skips, so you should adjust your buff usage and mechanic adherence accordingly.
Berserker
The bastard child tank, Berserkers are kind of odd. It seems like the developers started with an idea for making Berserkers into full-fledged tanks then dropped the idea mid-implementation. Berserkers have a block skill to begin with and at level 65 they can optionally unlock some additional skills to increase their aggro generation. They have no party buffs and are unable to enrage bosses. It's not impossible to play with a Berserker tank, but they need to be competent and the party needs to adjust to the lack of buffs and enrage.
If you are playing with a Berserker tank, remember that you'll have to wait for the natural enrage at the beginning (at 90% HP in most cases) and you won't get any buffs during the fight.
Healer Differences
You'll want to make a note of which healer class you have in your party at the start of the dungeon. Depending on the healer, you most likely will be adjusting your crit factor by swapping out pieces of gear, and then during the fight you might be adjusting your rotations based on whether or not cooldowns will line up. We'll have to consult some Healer mains to lock down some more details here but for now:
Priest
Priests give a conditional and limited crit factor buff but will give you attack speed and cooldown reduction from Energy Stars. This is why you see guides saying to run more crit factor with Priests than with mystic. The attack speed and cooldown reduction can make certain rotations work where they won't line-up without it. Keep in mind the energy stars bufff is not automatic and will depend on the Priest player to keep the buff up.
There is some crit factor buff potential from Priests but it requires a tal advancement and may or may not be present. You'll have to check your crit factor or ask to verify.
Mystic
Mystics have range-limited auras that will give you increased crit factor and continuous MP replenishment if they have the right ones turned on. They also have some cooldown reduction but not as much as energy stars, and only if they tal has been advanced.
B. Synchronizing Buffs with your Party
This is also similar to IV-D but takes into consideration the tank and healer and what kind of buffs and debuffs can come into play at the same time. With a well synchronized party, you can have the boss endurance and crit resist minimized while your party buffs are maximized for 10 to 40 seconds, resulting in a greatly increased period of DPS.
VI. How These Factors Impact Your Damage
soon (tm). Still planning the layout for this interactive thingy so you can mess with the different factors and see the results.

Want more content like this?
Get weekly digest that includes a monthly giveaway and discounts for the store side of How To TERA